Ahorra un 25 % (o incluso más) en tus costes de Kafka | Acepta el reto del ahorro con Kafka de Confluent
Self-Describing Events and How They Reduce Code in Your Processors
Have you ever had to write a program that needed to handle any data payload that could be thrown at you? If so, did you always have to update the said component with new parsing rules for the different data assets coming your way, with the added pain of redeploys and an endlessly growing codebase?
You’ve probably encountered a situation where you had a central routing/transforming application that you wished you could write once and never have to update again (one can dream, right?).
This blog post explores the powerful effects of using Confluent Schema Registry and “deep” event schemas while practically applying the concepts from the first blog post in this series on the design patterns for event modeling in Protobuf.
For part 3, see Advanced Testing Techniques for Spring for Apache Kafka.
The problem: The tyranny of data
Reinforcing Sam Newman’s keynote from Kafka Summit 2020 on the tyranny of data, the following explores how to pipe Apache Kafka® events to your reporting warehouse.
Specifically, we cover how to pipe Protobuf events to a downstream reporting system where operators need the events in JSON to quickly diagnose issues. This is a common scenario that allows application teams, call center departments, and auditing/regulatory initiatives to take place in a scalable and accessible way.
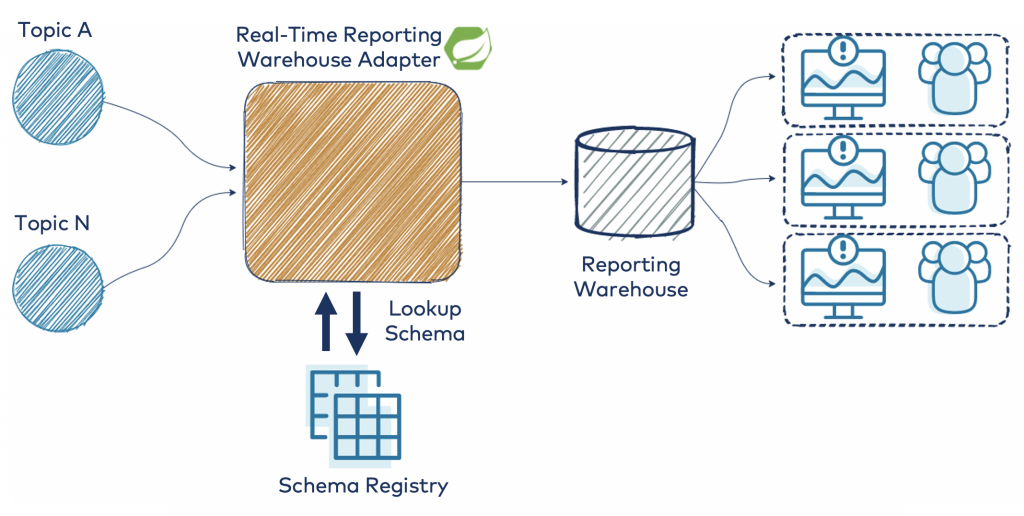
This architectural diagram shows the layout of the design that will be fleshed out:

The schemas will be defined in Protobuf as described in part 1, and we will use the deep envelope pattern for modeling the events. This is an important design constraint for the generic processor that you are going to write, as it allows you to convert any compliant event without adding custom code each time a new event schema is added to the ecosystem.
To help facilitate the writing of the generic processor, you will leverage Spring Boot’s Kafka library for quick setup and boilerplate Kafka consumer management.
Design walkthrough
The following processor code can be found on GitHub. Please note that the codebase is for demonstration purposes only.
Kafka consumer setup
To begin, you need to define your Kafka consumer. Spring Boot provides the @KafkaListener annotation to easily set it up. It enables you to bind to topics that you want to listen to via Spring Boot’s extensive configuration options (environment variables, YML, system properties, etc.).
@Service
public class ReportingWarehouseListener {
 private final GenericJsonConverter converter;
 private final ReportingWarehouseSender warehouseSender;

 public ReportingWarehouseListener(
     GenericJsonConverter converter, ReportingWarehouseSender warehouseSender) {
   this.converter = converter;
   this.warehouseSender = warehouseSender;
 }

 @KafkaListener(topicPattern = "#{kafkaConfig.getTopicPattern()}")
 public void processEvent(ConsumerRecord<String, DynamicMessage> kafkaRecord) {
   DynamicMessage event = kafkaRecord.value();
   warehouseSender.sendToWarehouse(converter.toJson(event));
 }
}
The following snippet configures a method that is invoked each time you have a new event to process from the configured topic regex. The configured topic regex is provided through the Spring Expression Language (SpEL), which invokes a getter on your KafkaConfig class.
To expose the topicPattern as a configuration parameter for your application, simply use Spring Boot’s @ConfigurationProperties annotation:
@Data
@Configuration
@Slf4j
@ConfigurationProperties(prefix = KafkaConfig.PREFIX)
@Validated
public class KafkaConfig implements InitializingBean {
 public static final String PREFIX = "zenin.kafka";
 @NotBlank private String topicPattern;

 @Override
 public void afterPropertiesSet() throws Exception {
   log.info(this.toString());
 }
}
The other annotations help generate some boilerplate code using Lombok, a popular package that helps generate accessors, constructors, and loggers with annotations. To obtain extra validation for topicPattern without writing the boilerplate logic, utilize the javax.validation.constraints package for annotations like @NotBlank.
Now you can easily configure the topicPattern that you want your processor to listen to:
zenin:
  kafka:
    topic-pattern: "prod\\..*"
Protobuf configuration and Schema Registry
You might be wondering about the DynamicMessage class that was in the ReportingWarehouseListener. This is a generic class that Google provides out of the box with their Protobuf Java library, and it is mentioned briefly in their documentation.
The Protobuf Java library does not handle the distribution of schemas. This is where Confluent Schema Registry comes into play, enabling the DynamicMessage class to become functional at scale. With this, you are able to parse at runtime any Confluent-Protobuf record by converting the binary payloads into the generic container of DynamicMessage (similar to a Map<String, Object> in Java). Protobuf’s wire format is not self-describing, but because of Confluent Schema Registry, your DynamicMessages will always have the schema needed to be able to parse the binary payload.
To deserialize Kafka events in the Confluent-Protobuf standard, configure your Spring Boot Kafka library with the following deserializers:
spring:
  kafka:
    consumer:
      properties:
        schema.registry.url: "http://127.0.0.1:8081"
      value-deserializer: io.confluent.kafka.serializers.protobuf.KafkaProtobufDeserializer
      key-deserializer: org.apache.kafka.common.serialization.StringDeserializer
This does all the heavy lifting in fetching schemas by the schema ID embedded in the Kafka record, as well as in schema caching and creation of the DynamicMessage object. Other settings also exist for the KafkaProtobufDeserializer, which casts the Protobuf payloads into the specific data class available on the classpath. Due to the nature of the application, the generic mode with DynamicMessage is used to avoid needing specific event classes to be on your classpath.
Generic JSON conversion
Now that you can read any Confluent-Protobuf record in your application, you can convert it to JSON for your downstream reporting system.
To avoid reinventing the wheel, there already exists a standard JSON converter supplied by Google in the Protobuf Java library called JsonFormat.Printer. (Note: You can always write your own if needed for performance or other major modifications). Configure the class as follows:
@Configuration
public class ProtobufConfig {

  @Bean
  public JsonFormat.Printer printer() {
   return JsonFormat.printer()
                    .preservingProtoFieldNames()
                    .omittingInsignificantWhitespace();
  }
}
This preserves the field names as they are defined in the Protobuf schema and also omits any extra whitespace when converting to a JSON string.
You can then write a method using the printer to transform your events:
private String convertEventToJson(DynamicMessage event)  {
  String json;
  try {
    json = jsonMapper.print(event);
  }  catch (InvalidProtocolBufferException e)  {
    throw new RuntimeException("Failed to convert event to JSON", e);
  }
  return json;
}
The output of the conversion looks like this (using the EnvironmentReadings Protobuf model from the previous blog post in this series):
{
  "reading_id": "c75a07b2-4110-4fa5-bfbd-40583d7ee834",
  "time_of_reading": "2020-09-25T00:47:22.650Z",
  "device_id": "b36742d1-c144-4248-926e-16acac6465d0",
  "latitude": 37.395199,
  "longitude": -122.079102,
  "elevation_in_meters": 32.0,
  "temperature_reading": {
    "temperature_in_celsius": -10.0
  }
}
Ignoring the fact that the above temperature is probably a bit too cold for the area, you can see that the timestamp is serialized using ISO 8601.
This might match the expectation of your reporting system, but it also might not. What if your system needs Unix timestamps or requires accuracy to the nanosecond?
Generic enhancing
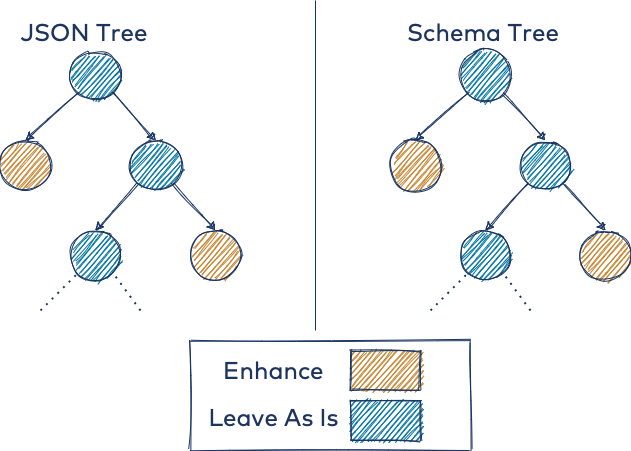
To address the need for different timestamp representations, you can utilize the DynamicMessage object as a tree data structure for your schema. With this strategy, you can write a tree traversal algorithm to enhance certain data types in a generic way.
The schema type scanning and subsequent JSON enhancement at the timestamp locations are illustrated below. Both trees represent the same event, where you only want to enhance the nodes in tan. The left tree shows the actual data to enhance, and the right tree shows where it should be enhanced.

At a high level, you can define enhancers in your application, such as a UnixEnhancer (see the repo for details on the utility functions for scanning the schema tree, etc.):
public class UnixEnhancer implements ITimestampEnhancer {
  private final GenericTools genericTools;
  …...

  @Override
  public JsonObject enhanceTimestamps(JsonObject jsonObject, DynamicMessage dynamicMessage) {
    Set timestampLocations =
        genericTools.getTimestampPaths(dynamicMessage.getAllFields().keySet(), "");
    timestampLocations.forEach(location -> setUnixTime(jsonObject, location, dynamicMessage));
    return jsonObject;
  }

  void setUnixTime(JsonObject jsonObject, String timestampLocation, DynamicMessage event) {
    final var entry = genericTools.getJsonElementEntry(timestampLocation, jsonObject);
    final var timestamp = genericTools.getTimestamp(event, timestampLocation);
    entry.setValue(new JsonPrimitive(timestamp.getSeconds()));
  }
}
There is also a similar enhancer for preserving the structure of the standard Protobuf type Timestamp, which preserves the milliseconds and nanoseconds recorded.
The following are two events enhanced with UNIX mode and PRESERVE_PROTO mode, respectively:
UNIX:
{
  "reading_id": "59db0644-d4bf-4a4d-8422-eb5bd6ad3ae3",
  "time_of_reading": 1600998019,
  "device_id": "be6d7094-698e-498f-bdef-8dff0c536a14",
  "latitude": 61.12245949618671,
  "longitude": 27.577309223873602,
  "elevation_in_meters": 1869.0,
  "ph_reading": {
    "ph_value": 2,
    "ph_type": "PHTYPE_ACIDIC"
  }
}
PRESERVE_PROTO:
{
  "reading_id": "de186a49-f5f7-4c5a-b3cd-088ec21f3036",
  "time_of_reading": {
    "seconds": 1600998074,
    "nanos": 520000000
  },
  "device_id": "7972736b-aa57-4a59-a219-e7df432c251d",
  "latitude": 35.56625496833527,
  "longitude": 29.854088167143328,
  "elevation_in_meters": 321.0,
  "precipitation_reading": {
    "delta_in_millimetres": 48
  }
}
Exposing these modes without recompiling your application is simple when defining your beans with Spring Boot’s @ConditionalOnProperty annotation.
  @Bean
  @ConditionalOnProperty(prefix = PREFIX, name = TIMESTAMP_MODE, havingValue = "GOOGLE")
  public ITimestampEnhancer googleStrategy() {
    return new NoOpEnhancer();
  }

  @Bean
  @ConditionalOnProperty(prefix = PREFIX, name = TIMESTAMP_MODE, havingValue = "UNIX")
  public ITimestampEnhancer unixStrategy(GenericTools genericTools) {
    return new UnixEnhancer(genericTools);
  }

  @Bean
  @ConditionalOnProperty(prefix = PREFIX, name = TIMESTAMP_MODE, havingValue = "PRESERVE_PROTO")
  public ITimestampEnhancer protoPreservingStrategy(GenericTools genericTools) {
    return new ProtoPreservingEnhancer(genericTools);
  }
Sending transformed events downstream
The codebase does not implement the actual delivery of the JSON events via HTTP as this is highly dependent on your downstream system.
However, you have the ability to also extract generic metadata about your event through introspection on the DynamicMessage class. Any common attributes you know that are present, such as event_id, category, and so forth, can be used to plug into various parts of your downstream system’s API spec. So if your reporting system needs to assign an ID to each ingested event, you can simply extract it from the message.
The above strategy only works if you have mandated a certain pattern for your event designs, either by word of mouth or through automation of schema management. If the event_id field is not populated (say, it is left blank by the producer), you could implement a fallback mechanism to use the metadata of the ConsumerRecord class from the Kafka client API. To do this, generate a fallback ID that looks like the following:
${topic}-${partition}-${offset}-${timestamp-type}-${timestamp}.
This formulation guarantees uniqueness within a Kafka cluster,* and is also resistant to topics being deleted and recreated (as is often the case in lower-level environments) by adding the Kafka record’s timestamp attributes.
*The formulation guarantees uniqueness if the producer does not override the timestamp in the ProducerRecord when using CREATE_TIME mode or if the topic uses LOG_APPEND_TIME. It is assumed that the brokers’ clocks are always monotonically increasing and are closely synchronized.
By utilizing deterministic IDs and assuming those IDs are unique, the generic processor can guarantee exactly-once delivery to an idempotent downstream system.
Bringing it all together
In summary, here are the key takeaways from this post:
- Your event designs matter! How you express your events can simplify or complicate generic transformations and standardized field extraction. This can be a deal breaker when you need an application to process thousands of distinct data assets without engaging every single team that owns them.
- Confluent’s KafkaProtobufDeserializer and Protobuf’s DynamicMessage classes simplify writing generic processors and schema traversal algorithms.
- Spring for Kafka helps reduce the boilerplate in configuration management and simplifies Kafka consumer interaction.
The final post of this three-part series dives deeper into testing the generic processor for transient errors in a multi-threaded environment. If you haven’t already, make sure to check out part 1.
Get started with event streaming
If you’d like to know more, you can sign up for Confluent Cloud and get started with a fully managed event streaming platform powered by Apache Kafka. Use the promo code SPRING200 to get an additional $200 of free Confluent Cloud usage!
¿Te ha gustado esta publicación? Compártela ahora
Suscríbete al blog de Confluent
New with Confluent Platform 7.9: Oracle XStream CDC Connector, Client-Side Field Level Encryption (EA), Confluent for VS Code, and More
This blog announces the general availability of Confluent Platform 7.9 and its latest key features: Oracle XStream CDC Connector, Client-Side Field Level Encryption (EA), Confluent for VS Code, and more.
Meet the Oracle XStream CDC Source Connector
Confluent's new Oracle XStream CDC Premium Connector delivers enterprise-grade performance with 2-3x throughput improvement over traditional approaches, eliminates costly Oracle GoldenGate licensing requirements, and seamlessly integrates with 120+ connectors...

