[Virtuelles Event] GenAI Streamposium: Lerne, Echtzeit-GenAI-Apps zu entwickeln und zu skalieren | Jetzt registrieren
How to Elastically Scale Apache Kafka Clusters on Confluent Cloud
Elasticity is one of the table stakes for a mature cloud service. Elasticity enables the addition of capacity in a cloud service as needed to meet spikes in demand, and subsequent reduction during periods of low usage. This allows you to align your consumption with business demands and keep costs optimal while ensuring you have the required capacity at all times.
Confluent Cloud now supports elastic Apache Kafka® clusters, allowing you to expand and shrink dedicated clusters in terms of CKUs (Confluent Unit for Kafka)—the unit of capacity for dedicated Kafka clusters in Confluent Cloud. This blog post covers the details of this capability in Confluent Cloud.
Expanding and shrinking a Dedicated Kafka cluster
Resizing Kafka clusters in Confluent Cloud is fully self-serve, giving you the control to manage the capacity of your clusters to align with your needs. This capability is available through Confluent Cloud’s UI, CLI, and public APIs so you can also handle this task programmatically.
Along with the ability to expand and shrink a Kafka cluster, we recently added a cluster load metric that presents the utilization of your Kafka cluster. Understanding cluster utilization is critical before you decide to resize your cluster so that you do not adversely affect performance. Monitoring the cluster load can alert you to add capacity when load exceeds a certain critical threshold, say 70%. You can choose to continue to operate the cluster at a high load, but doing so will lead to increased producer/consumer latency and throttling. Conversely, when load drops below a certain threshold, you might consider reducing the capacity of the cluster to reduce cost.
Before diving into the details of the user experience around these new features, there are some key points to note:
- The capability to expand and shrink clusters applies to Dedicated Kafka clusters in Confluent Cloud. Standard and Basic clusters seamlessly scale from 0 to 100 MB/s without requiring any action on the users’ part.
- Behind the scenes, cluster resizing is a two-step process. You first need to either add capacity (expansion), or remove capacity (shrink), and then rebalance the data on the cluster. Rebalancing data on the cluster is critical to ensuring that you derive optimal performance from the available capacity.
- The amount of time it takes to resize a cluster depends on the number of CKUs being added or removed, as well as the amount of data to be rebalanced. Adding or removing a CKU usually takes a couple of hours.
- While an existing resize operation is in progress, another resize task cannot be initiated.
- Once an in-progress resize operation completes, users will receive a notification.
- Cluster capacity is billed so as to provide customers with the maximum benefit. Billing at higher CKUs only starts once newer resources are added to the cluster and data is fully rebalanced. Billing at lower CKUs starts as soon as a shrink request is received.
- There are safeguards in place to prevent cluster shrink in case utilization is high along certain CKU dimensions, and warnings to notify users about a high load on the cluster.
The following looks at how cluster resizing works.
Confluent Cloud UI
You can monitor cluster load either on the Confluent Cloud UI, or by using the Metrics API. For the cluster shown below, the cluster’s load is at 44%. Additionally, you can also look at the historical cluster load on the cluster dashboard to verify that the current load on the cluster has been sustained for some time rather than being a temporary spike.

Historical cluster load
If you anticipate adding some more workloads to this cluster, you might decide to expand the cluster to prepare for this increase in demand. To do so, you would navigate to the “Cluster overview → Cluster settings → Capacity” tab. This tab shows the current capacity of the cluster along with the usage for each CKU dimension, as well as the cluster load.
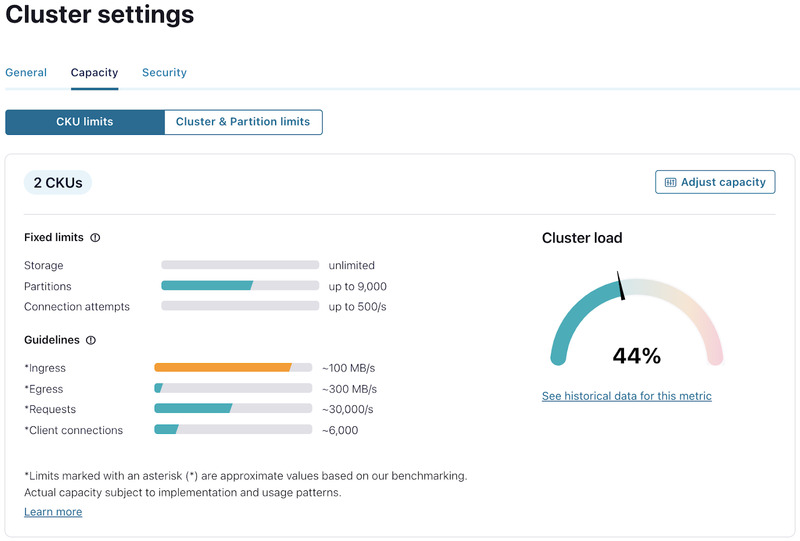
To expand or shrink the cluster, click on “Adjust capacity” to view the slider which allows for the addition or removal of CKUs. As you move the slider, you can see the updated capacity that would be available for each CKU dimension, before you proceed with the resize.
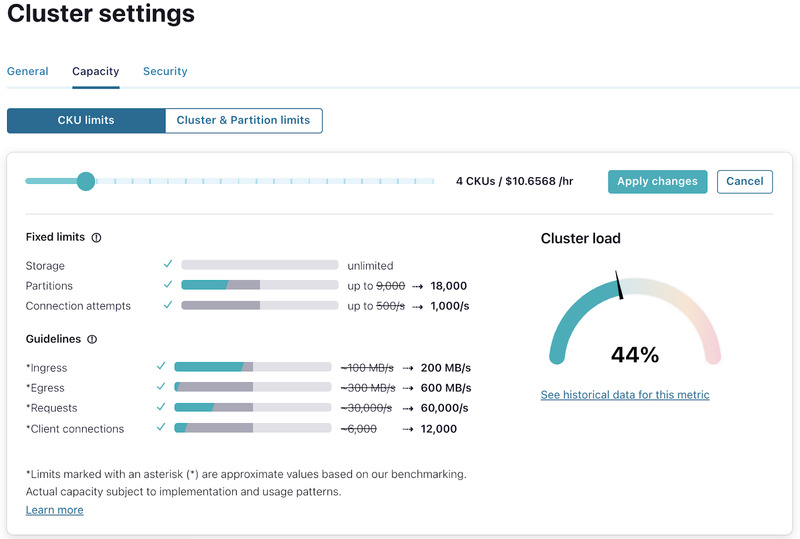
Cluster expansion from 2 to 4 CKUs
Once you click “Apply changes” you are presented with a confirmation screen that shows how the resize will change the associated base cost for the cluster.
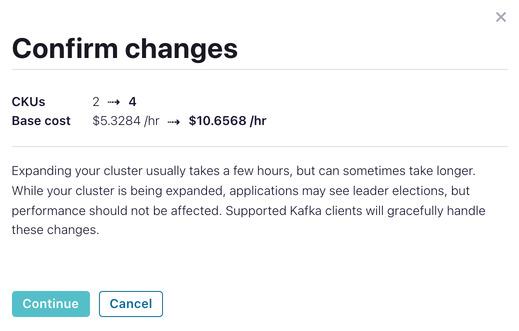
Upon clicking “Continue,” the cluster expansion will commence and you will see a banner in the cluster settings screen that indicates an expansion or shrink operation is in progress. Once the expansion completes you will receive a notification.

Cluster shrink operations follow the same flow except there are certain safeguards in place to prevent shrinking if it will have an adverse impact on the cluster’s performance. In this case, the final confirmation screen will warn you about usage on any CKU dimensions that exceed the capacity of the post-shrink cluster, as well as if the cluster load is above a certain threshold.
The scenario below attempts to shrink a cluster from 2 CKUs to 1 CKU.
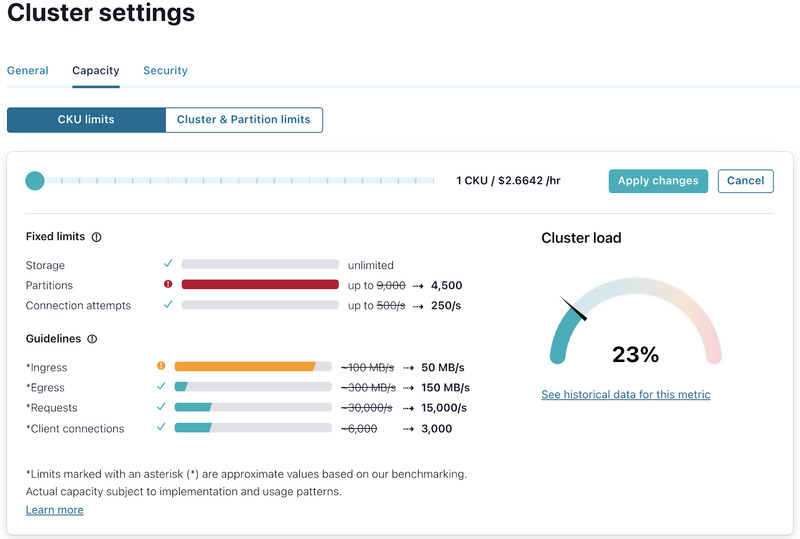
Here, the number of partitions on the cluster is more than 4,500 (which is the maximum number of partitions available for a 1 CKU cluster). It is not possible to shrink this cluster unless the number of partitions is reduced to < 4,500.
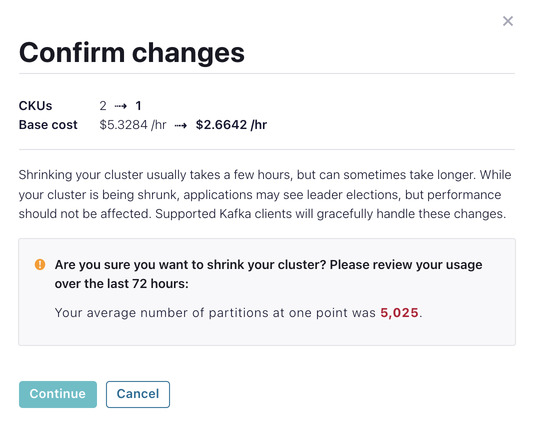
The confirmation screen displays a warning about the number of partitions being greater than the number of CKUs in the post-shrink cluster will support. Upon clicking “Continue” the shrink operation fails with the error message shown below:
![]()
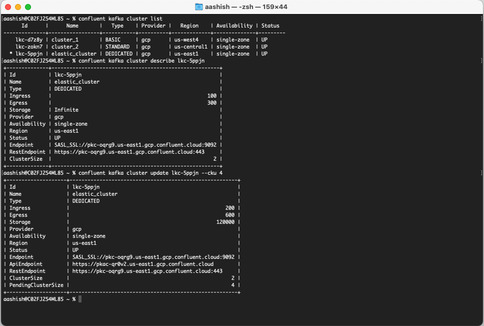
From the Confluent CLI, you can expand or shrink a cluster by using the cluster update command, as shown below. Here an update is issued to expand a 2 CKU cluster to 4 CKUs.
Confluent Cloud APIs
To resize a cluster using Confluent Cloud public APIs, you first need to create a Cloud API key. Once you have the Cloud API key you can use “Basic Auth” and access the cluster update API to add or remove CKUs to the cluster.
The screenshot below shows details the expansion of a 2 CKU cluster to 4 CKUs.
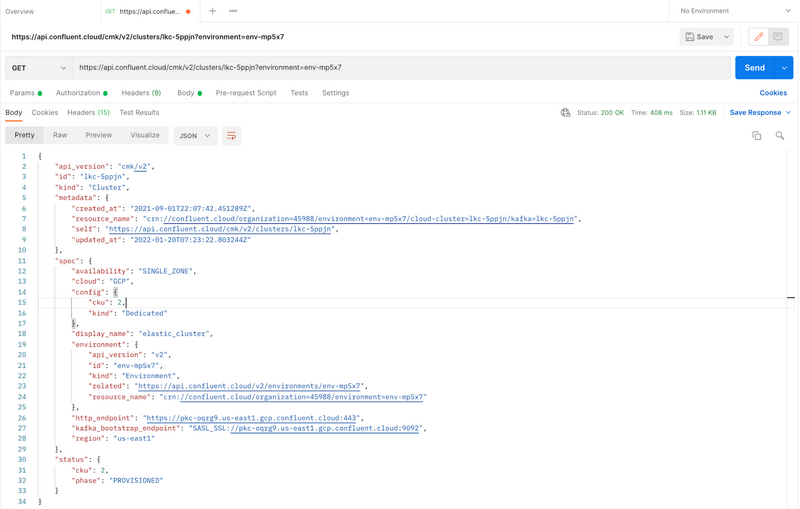
Cluster details for a 2 CKU cluster
You can see the API call to update the cluster from 2 to 4 CKUs and the response in the screenshot from Postman below:
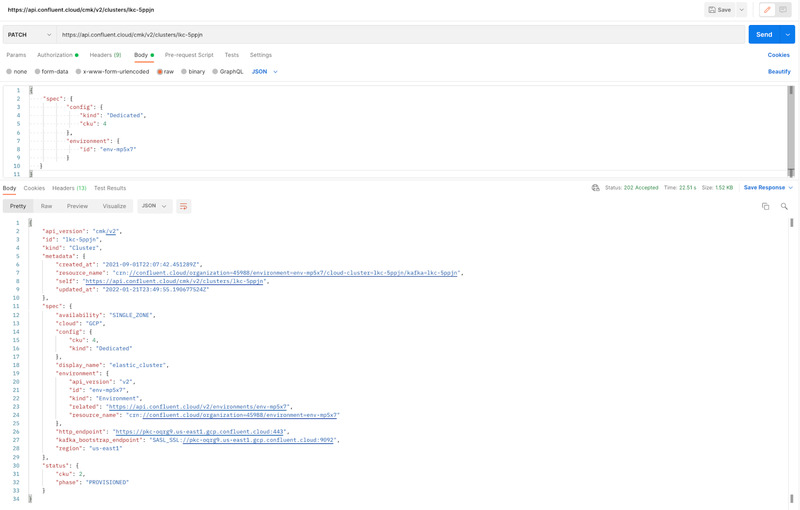
Cluster update from 2 CKUs → 4 CKUs
What’s next
This post demonstrates elasticity in action for Confluent Cloud dedicated Kafka clusters, highlighting the user experience using Confluent Cloud’s UI, CLI, and APIs as well as details of how the control plane handles cluster resize operations. This post also covered certain key aspects of the overall experience from the users’ perspective. An earlier blog post demonstrated how to remove the brokers and rebalance data on a Kafka cluster. Stay tuned for an upcoming blog post that will detail this from the Confluent Cloud control plane perspective. In the meantime, if you’re ready to get started with Confluent Cloud, use the promo code CL60BLOG for an additional $60 of free usage when you sign up for a free trial.*
Providing the self-serve capability to resize clusters is the first step. In the future, we plan to provide functionality to enable autoscaling on dedicated Kafka clusters. For example, users would be able to set policies on their clusters and auto-scale clusters based on those policies. This would further reduce operational burden and allow users to completely offload capacity management, while ensuring they have the desired capacity when needed without having to proactively monitor and take actions to add or remove capacity.
Related content
Ist dieser Blog-Beitrag interessant? Jetzt teilen
Confluent-Blog abonnieren
New with Confluent Platform 7.9: Oracle XStream CDC Connector, Client-Side Field Level Encryption (EA), Confluent for VS Code, and More
This blog announces the general availability of Confluent Platform 7.9 and its latest key features: Oracle XStream CDC Connector, Client-Side Field Level Encryption (EA), Confluent for VS Code, and more.
Meet the Oracle XStream CDC Source Connector
Confluent's new Oracle XStream CDC Premium Connector delivers enterprise-grade performance with 2-3x throughput improvement over traditional approaches, eliminates costly Oracle GoldenGate licensing requirements, and seamlessly integrates with 120+ connectors...

